Every cottage bakery has a recipe that started it all. This is mine.
Jump to RecipeIt is just flour, water, salt, and sourdough starter, yet it is the dough I built my bakery on. I have baked it into everything: simple round loaves, crisp baguettes, bread bowls, seasonal shapes like pumpkins and bunnies, filled breads with cheese or fruit, and more. If you have seen me bake it, it probably began here.
Thank you for reading this post, don't forget to subscribe!This dough is forgiving and flexible. You can bake it the same day or let it slow down with a cold proof for up to two days. It is easy to adapt to your kitchen’s temperature, your schedule, or whatever shape you are dreaming of.
It is slightly different from the Easy Sourdough recipe already on my site.
- It uses a touch of whole wheat (I love spelt) for more depth of flavor and has more water.
- That extra nutrition and hydration also helps the dough ferment a little faster.
- It is designed to be your base dough for almost anything: rustic loaves, baguettes, inclusion breads like cranberry & pecan, chocolate chip, cheese & chives, seeds, and beyond.
If you want a reliable, flexible sourdough recipe that can grow with your baking skills, this is the one!
My Cottage Bakery Original Sourdough Recipe
Equipment
Ingredients
- 50 grams bubbly, active sourdough starter
- 365 grams warm filtered water
- 450 grams all-purpose flour (11%+ protein) or bread flour
- 50 grams whole wheat flour (I use spelt)
- 10 grams fine sea salt
Instructions
- Mix the Dough.Stir together your starter and water until it looks milky. Add both flours and the salt. Mix until everything is fully combined and no dry flour remains. Really make sure there’s nothing dry hiding at the bottom of the bowl and throughout the dough. The dough will feel sticky, but that’s exactly right.Cover and let rest for 30 minutes. While it rests, feed your starter.
- Stretch + Fold. Once the dough has rested, wet your hands and gently lift one side of the dough up and fold it over. Turn the bowl and repeat until you've gone all the way around.Do this same process two more times, about 30 minutes apart. After the third fold, cover the dough and move into the bulk fermentation stage.
- Bulk Ferment. Let the dough rise, covered at room temperature, until it’s soft, airy, lighter to the touch, and no longer sticky. It will also have a domed top. At 70°F, this takes about 8–10 hours.
- Pre-shape. In the morning, turn the dough onto a lightly floured surface. Fold it in toward the center a few times to create a round, then let it rest for about 20 to 30 minutes, uncovered. This allows the gluten to relax before the final shaping.
- Final Shape. Flip the dough so the seam faces up. Take two opposite sides, lift and clasp them over each other in the center, then rotate the dough 90° and clasp the other two sides the same way. While pinching the clasped edges, place seam-side up into a floured proofing basket or a towel-lined bowl (this technique is called the Caddy Clasp).
- Second Rise. Let the dough rise again for 1–2 hours at room temperature, or transfer it to the fridge for a longer cold proof. I usually go with the fridge, it gives me more flexibility and the dough is easier to score when cold. If choosing the fridge option, you can leave it in there and bake anytime within the next 2 days straight from the fridge.
- Bake. Preheat your oven to 450°F with your Dutch oven inside for at least 30 minutes.When ready, flip the dough out of the basket onto a piece of parchment. You will use the parchment like a sling to carry the dough to the dutch oven. Score with a bread lame or sharp knife and transfer to the Dutch oven. Bake for 20 minutes covered, then 25–30 minutes uncovered, until the crust is deeply golden.Let it cool on a wire rack for at least one hour before slicing. Enjoy!
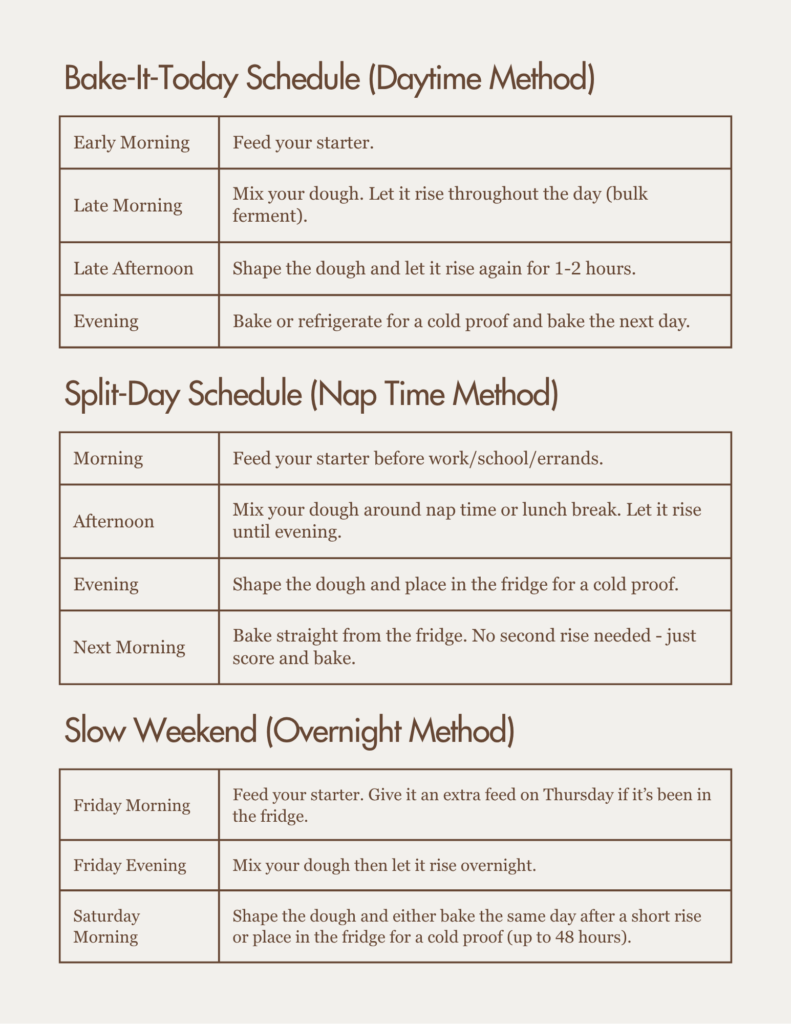
It’s easy to assume that the timing of sourdough can be tricky. But this doesn’t have to be the case! Here are a few sample schedules to help you be successful 🙂
